
XAMPP is a free and open-source software that creates a local web server environment on your computer. Think of it as a mini-internet within your machine. Here's why developers use XAMPP:
Convenience and Ease of Use:
- XAMPP bundles all the essential components – Apache web server, MariaDB database, and interpreters for PHP and Perl – into a single package. This eliminates the need to install and configure each component separately.
- The user-friendly interface allows you to easily start, stop, and manage the web server, database, and other services.
Local Development Environment:
- XAMPP provides a safe and isolated space to develop and test websites before deploying them to a public server. This lets you:
- Work on code without affecting a live website.
- Experiment with functionalities and fix bugs without any risk.
- Test website responsiveness across different browsers.
Learning Platform:
- Beginners can use XAMPP to learn web development technologies like HTML, CSS, PHP, and MySQL. They can practice coding, see how websites function, and understand how these components work together.
Versatility:
- XAMPP is cross-platform, working on Windows, macOS, and Linux. This makes it a suitable tool for developers regardless of their operating system.
- It can be extended with additional modules like phpMyAdmin (for database management) or FileZilla (for file transfer).
Cost-Effective:
- Being free and open-source, XAMPP is a budget-friendly option for individual developers, small businesses, or educational institutions.
Here's a quick recap:
XAMPP provides a convenient, all-in-one solution for setting up a local web server environment. It simplifies development and testing for web developers and serves as a valuable learning platform for beginners. However, it's important to remember that XAMPP's default security settings are not ideal for running websites publicly due to their accessibility.
Easy XAMPP Installation Guide for Beginners (2024)
Installing XAMPP on Windows
This guide walks you through installing XAMPP on your Windows machine. While the steps might differ slightly for Linux and macOS, the overall process remains similar.
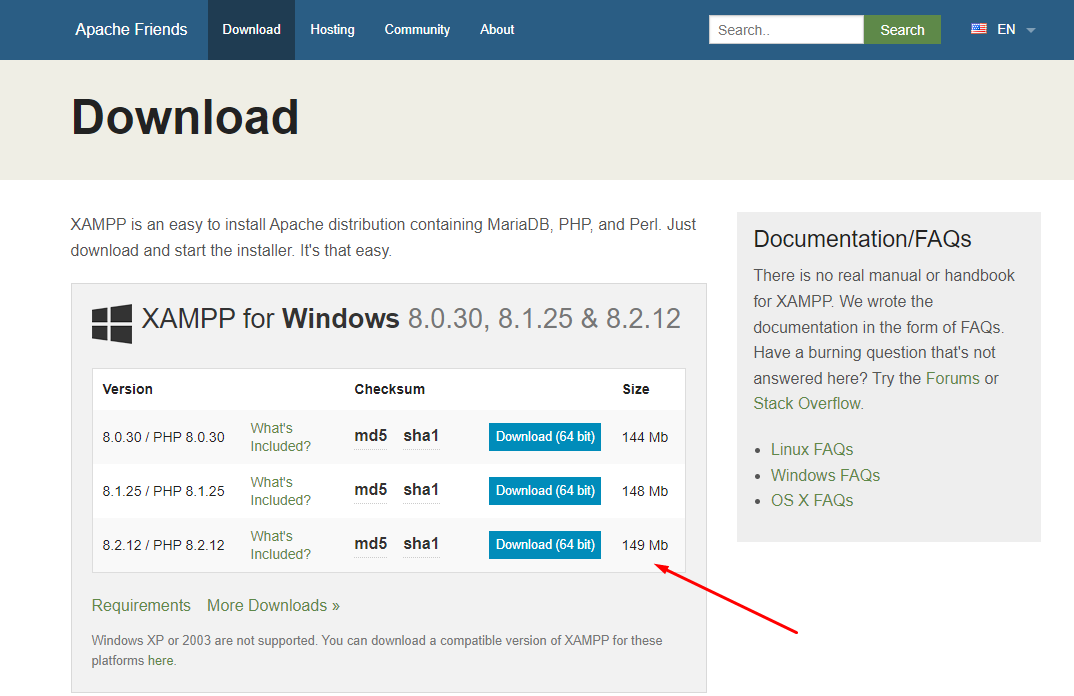
Step 1. Download XAMPP:
Head over to the official XAMPP website: https://www.apachefriends.org/download.html. Download the version compatible with your Windows system.
Step 2. Run the Installer:
Once downloaded, double-click the installer file (usually ending in .exe). This will initiate the installation process.
Step 3. (Optional) Temporarily Disable Antivirus:
Antivirus software might sometimes interfere with the installation. Consider temporarily disabling it during the process (remember to re-enable it afterward).
Step 4: Manage User Account Control (UAC) (Optional)
User Account Control (UAC) is a Windows security feature that can sometimes prompt for confirmation during installation. While temporarily disabling UAC might be mentioned in some online guides, it's generally not recommended for security reasons.
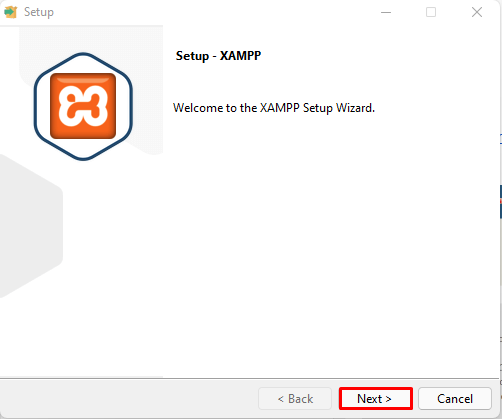
Step 5: Launch the Setup Wizard
Once you've downloaded the XAMPP installer and addressed any antivirus or UAC considerations, the setup wizard will automatically launch. Click “Next” to begin configuring the installation settings for XAMPP on your system.
Step 6: Choose Software Components (Optional)
The “Select Components” section allows you to customise the XAMPP installation. By default, all components are selected for a complete local server setup.
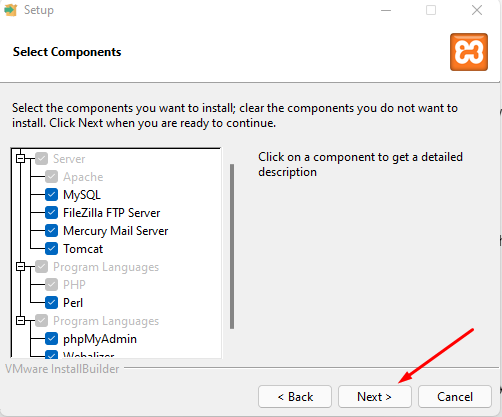
Here's what you can do:
- Install all components (recommended): Choose this for a full-featured local test server.
- Uncheck specific components: If you only need certain features (e.g., Apache and PHP), deselect the ones you don't require.
Step 7: Select Installation Directory
This step lets you choose where XAMPP will be installed on your computer.
- Default Installation:
Leaving the settings unchanged will install XAMPP in the “C:\xampp” directory. - Custom Installation:
Click “Browse” to select a different location on your computer where you'd prefer to install XAMPP.
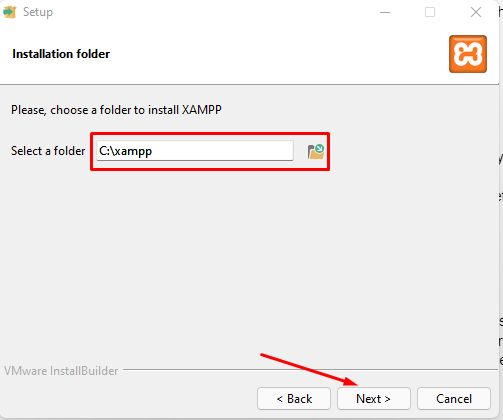
Once you've chosen the installation directory, click “Next” to proceed.
Step 8: Initiate Installation
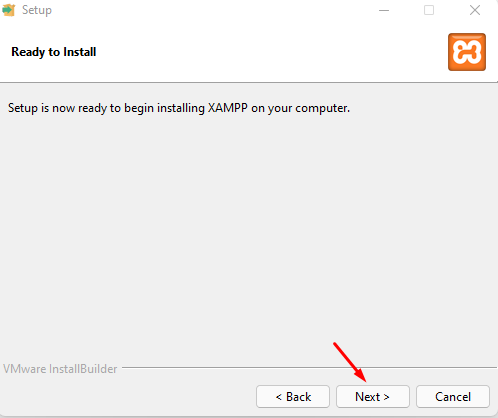
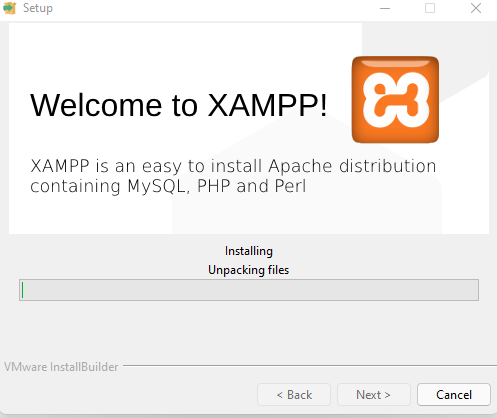
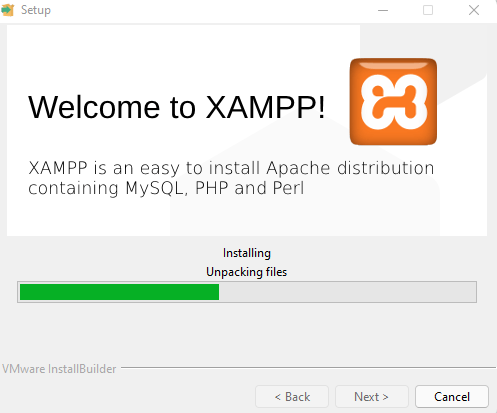
After finalising your preferences, click “Install” to begin the XAMPP installation process. The setup wizard will unpack and install the chosen components in the designated directory. A green progress bar will track the installation, which might take a few minutes to complete.
Step 9: Firewall (Optional)
Windows Firewall might ask you to allow access for XAMPP. Check the box to enable communication within your private network for local development on your machine. Avoid enabling it for public networks for security reasons.
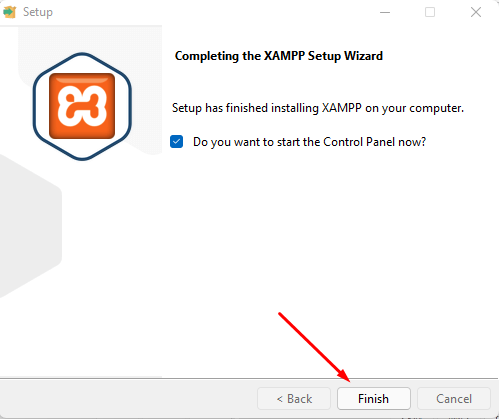
Step 10: Finish Up
Once the installation is complete, click “Finish” to close the setup wizard. You can optionally choose to launch the XAMPP Control Panel by checking the corresponding box. This control panel allows you to manage your XAMPP server.
XAMPP Control Panel: Command Center for Your Local Server
The XAMPP Control Panel is your central hub for managing your local development environment. It offers a clear and intuitive interface with the following functionalities:

- Start/Stop Modules: Control individual services like Apache, MySQL, and PHP with easy-to-use buttons. Start them when you need them and stop them when you're finished to conserve resources.
- Configuration: Fine-tune settings for both XAMPP itself and its components through the dedicated “Config” button. This allows you to customise your local server's behaviour.
- Process Monitoring: Keep track of all running processes on your computer using the “Netstat” button. This helps you understand what's happening in your system.
- Advanced Features: For users comfortable with command lines, the “Shell” button opens a UNIX shell environment, allowing direct interaction with the system. (Optional for most users)
- File Management: Navigate to the XAMPP installation directory with the “Explorer” button. This provides easy access to your server files for configuration or project management.
- Service Overview: Get a quick glimpse of all background services currently running on your computer with the “Services” button.
- Help Resources: Access the “Help” button for links to user forums and support resources to troubleshoot any issues you might encounter.
- Exit Control Panel: Simply click “Quit” to close the control panel when you're finished working with your local server.
This XAMPP Control Panel empowers you to manage and optimize your local development environment efficiently.
Running Your Website Offline: A Guide to Localhost with XAMPP
- Start XAMPP Control Panel: Locate the XAMPP icon in your system tray (usually near the clock) or find it in your Start menu. Click the icon to launch the Control Panel.
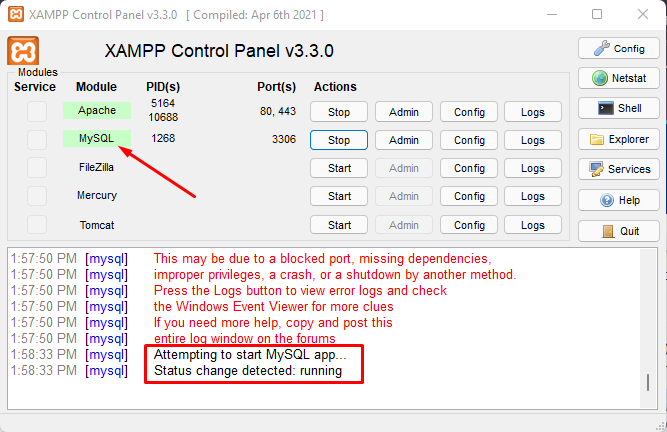
- Start Essential Modules:
- Look for the “Actions” column for modules like Apache (web server) and MySQL (database).
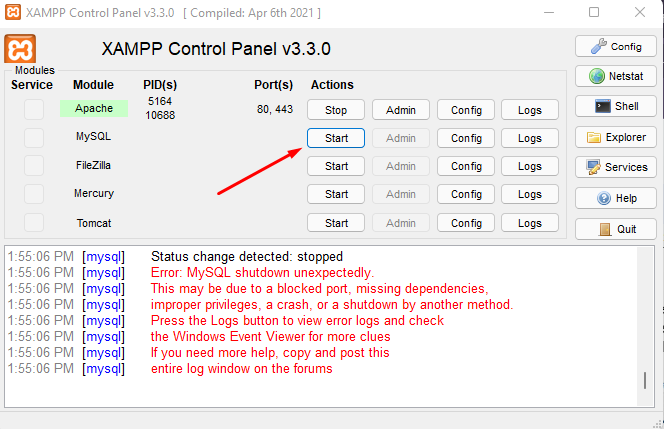
- Click the “Start” button next to each module to activate them. These are crucial for running your local server environment.
- The buttons will switch to “Stop” once the modules are running, and their names will be highlighted green.
1. Verify Your Local Server:
- Open a web browser on your computer.
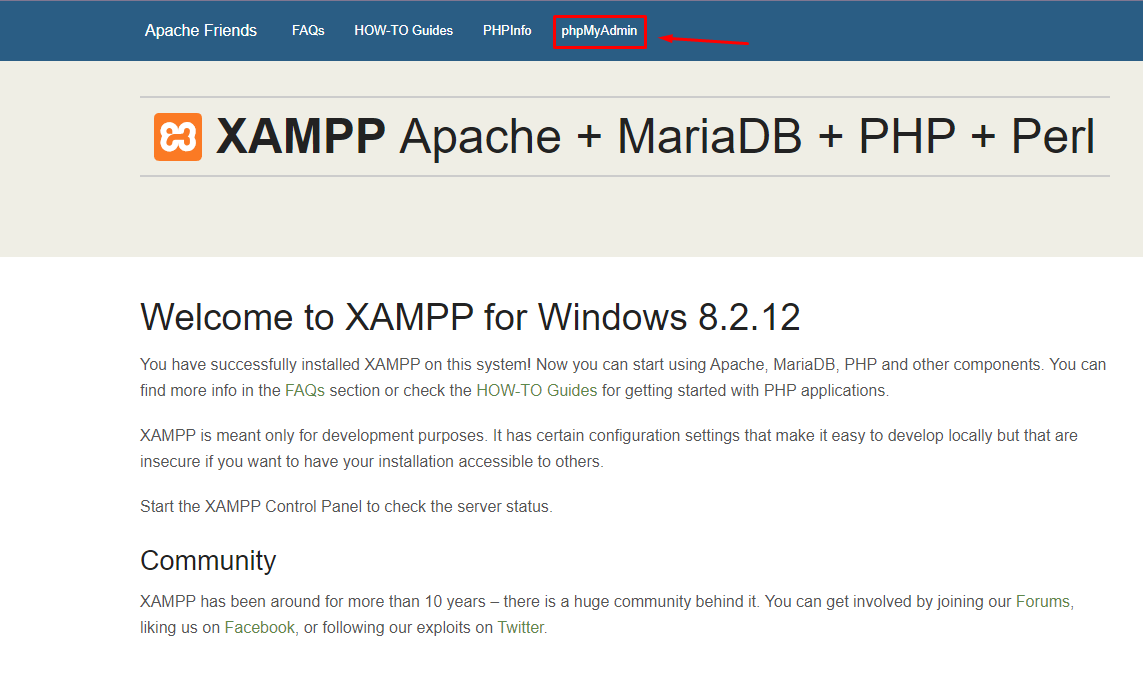
- In the address bar, type “http://localhost/” (or “http://127.0.0.1/”). This is the default address for your local server.
- If XAMPP is running correctly, you should see the XAMPP welcome page displayed in your browser.

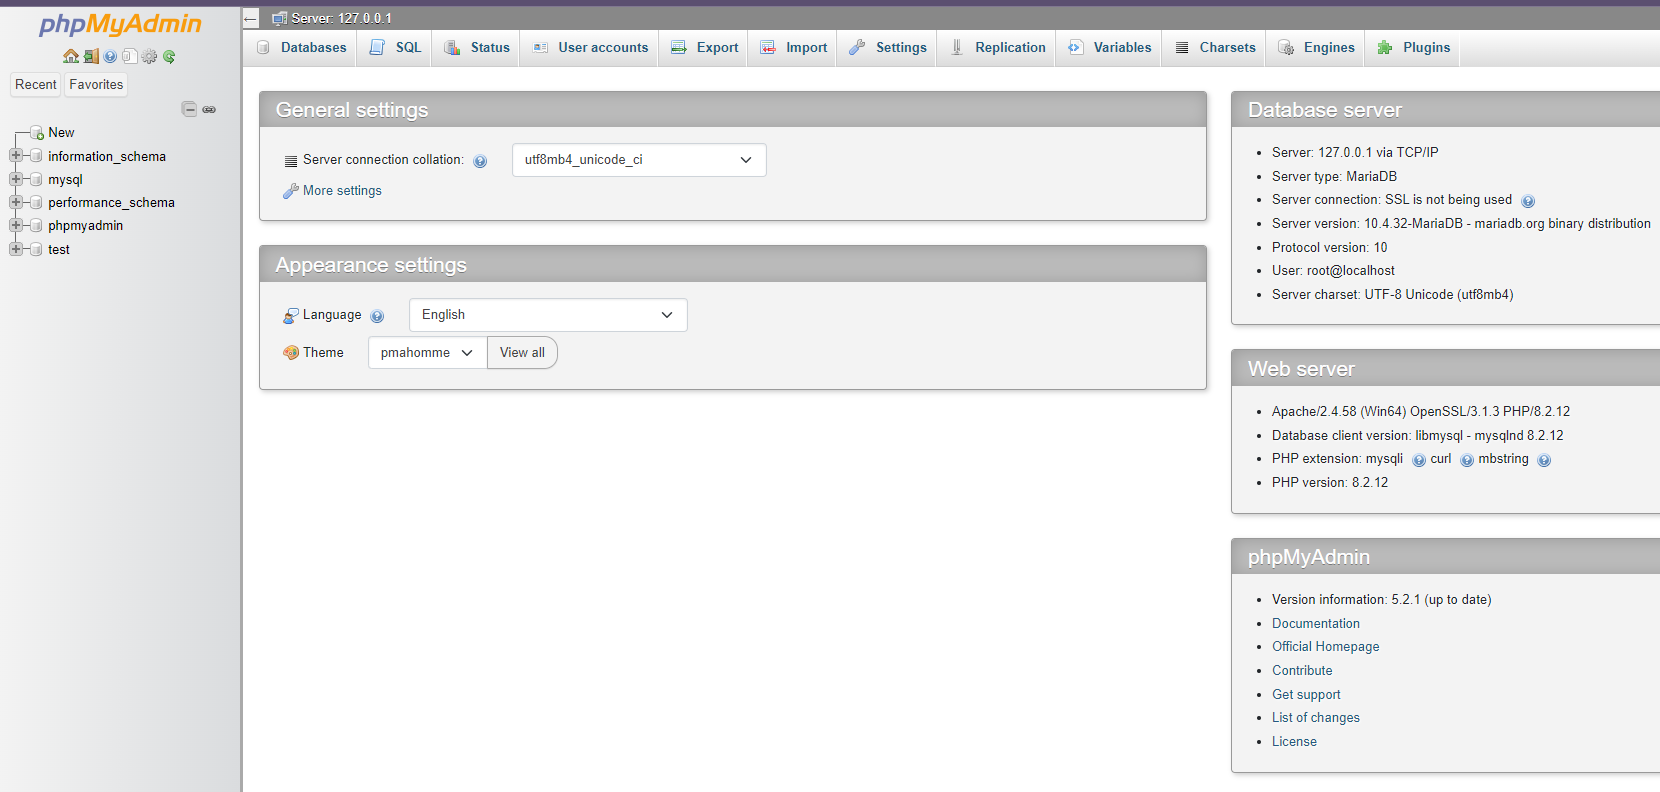
Click phpmyadmin and your phpmyadmin will open.
- You can create tables and databases for websites.
2. Accessing Your Projects:
- By default, XAMPP stores your web project files in the “htdocs” folder within the XAMPP installation directory (usually C:\xampp\htdocs on Windows).
![]()
- Place your HTML, CSS, PHP, or other web development project files within this “htdocs” folder.
- To access your project in the browser, navigate to the specific file location. For example, if your project's main file is named “index.html” and placed directly in the “htdocs” folder, you can access it at “http://localhost/index.html” in your browser.
Additional Tips:
- Remember to start Apache and MySQL before attempting to access your projects.
- Ensure your firewall settings allow communication for XAMPP if you encounter access issues.
- The XAMPP Control Panel offers functionalities like configuration and managing the MySQL database (phpMyAdmin). Explore these features as needed to customise your local development environment.
- When finished, stop the modules using the “Stop” buttons and close the Control Panel.
By following these steps, you'll have XAMPP installed and configured, allowing you to use localhost for your web development projects within a local server environment.