
WAMP Server is a free and open-source software package that allows you to set up a development environment for web applications on your Windows computer.
WAMP stands for Windows, Apache, MySQL, and PHP, which are the key components it integrates:
- Windows: The operating system where WAMP Server runs.

- Apache: A web server software that processes incoming web requests and delivers web content (like HTML pages) to users.

- MySQL: A popular open-source relational database management system (RDBMS) used for storing and managing data for dynamic web applications.

- PHP: A server-side scripting language for creating dynamic and interactive web pages.
Why use WAMP Server?
WAMP Server provides a convenient way to set up a local development environment on your Windows PC. This allows you to:
- Develop and test PHP web applications: Without needing an internet connection or external server.
- Work offline: Make changes to your code and see the results immediately in your web browser.
- Learn PHP development: Experiment and practice writing PHP code in a controlled environment.
Benefits of using WAMP Server:
- Easy to install and use: The installation process is straightforward, and WAMP Server provides a user-friendly interface for managing your development environment.
- Free and open-source: You can download and use WAMP Server for free, without any licensing costs.
- All-in-one solution: It integrates all the necessary components for PHP development in a single package.
- Lightweight: WAMP Server has a relatively small footprint and doesn't require significant system resources.
Here's an analogy to understand how WAMP Server works:
Imagine your computer as a restaurant kitchen. WAMP Server is like having all the essential equipment you need:
- Apache (Web Server): Acts like the wait staff, taking orders (requests) from customers (browsers) and delivering them the prepared food (web content).
- MySQL (Database): Functions as the pantry or storage area, holding all the ingredients (data) needed for the dishes.
- PHP (Scripting Language): Plays the role of the chef, processing the orders (requests), retrieving ingredients (data) from the pantry (database), and preparing the final dishes (web content) to be served.
By having these components working together, you can create a complete web development environment on your local machine.
Step-by-Step Guide: Installing a WAMP Server on Your Computer
Follow the below steps and install WAMP effortlessly.
Step 1
- Go to the official website to download WAMP from here
- This will redirect you to the WAMP download page.
- The web server has two versions. 32-bit and 64-bit. Download the version according to your system configurations.

Step 2
- Once you click the download , you will see a pop-up message. It will show some warnings. Don’t worry about that. Just leave it and click the link “download directly”.

- Click the download the latest version of WAMP and your WAMP downloading is start.
Step 3
- Now the “Select Setup Language box” will appear. Here you have to choose your preferred language. Most of them will choose English only. And then click “OK”.

Step 4
- The License Agreement Window will open. Select the “I accept the agreement” and click “Next”.

Step 5
- Now it will provide information on the basic components that need to be in your computer, for the proper functioning of the WAMP Server. Read the information and then click “Next”.

5A. If you can’t go the next step then try these steps to go next step
- Check WAMP Version: Find your WAMP server version (usually in the documentation or installation directory). This helps determine which VC++ you need.
- See if it's 32-bit or 64-bit: Right-click “This PC” (or “My Computer”) and select “Properties” to see your system type (32-bit or 64-bit). This is important for downloading the correct VC++ package.
- Download VC++: VC++ Redistributable Downloads page.

- VisualCppRedist AIO All Releases
- VisualCppRedist AIO
- Click one of these two links to go to the next page.
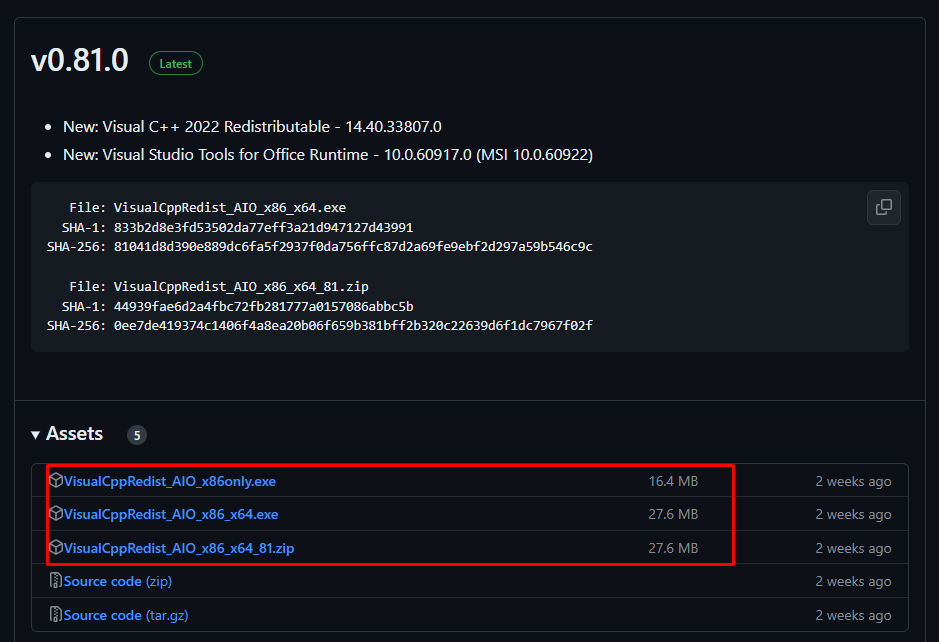
- Click and download the VC++ file and run .It will download the all necessary files which are important to download the WAMP.
- Restart (Maybe): If prompted to restart your computer, do so. This ensures the VC++ changes take effect.
- VC++ Ready WAMP! With these steps, your WAMP server should now have the necessary VC++ components to run smoothly. Now go to step 6.
Step 6
- On the next screen select the destination for the Wamp installation .

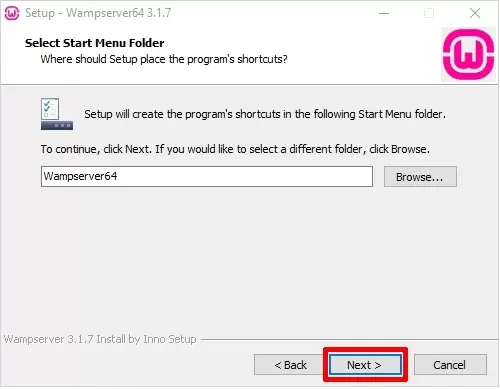
Step 7
- Now you have to select “Where should Setup place the program’s shortcuts?” Browse and select the location. Then click “Next”.
Step 8
- Ready to Install window will open. “Click Install”.

Step 9
- WAMP server has started installing. The WAMP server extracts the files to the selected location. Wait until the installation is completed.

Step 10
- Once the installation is done, you are shown with the information screen.Then click “Next”.

Step 11
- Click “Finish” to complete the installation.

- Your WAMP installation is completed.
Has WAMP installed and started successfully?
There are two main ways to check if WAMP has been successfully installed:
1. WAMP Server Icon:
- Look for the WAMP server icon in your system tray (usually the bottom right corner of your taskbar).
- Green icon: WAMP is running smoothly and all services are functioning properly.
![]()
- Orange or red icon: Indicates an issue with one or more services (Apache, MySQL). You'll need to investigate further to troubleshoot.
1. Testing with your Browser:
- Open a web browser and navigate to http://localhost/ in the address bar.
- WAMP Server Homepage: If you see the WAMP server homepage displayed, it's successfully installed and running.


- Error Page: If you encounter an error page, there might be configuration issues or conflicts with other programs using the same ports.