
In this step-by-step guide, we'll cover the essential concepts you need to know to get started with databases. We'll walk you through setting up a simple database, creating tables, and entering data. By the end, you'll have a basic understanding of how databases work and the skills to create your own.
Step 1: Start WAMP in your system. If you don’t have WAMP or do not know about starting WAMP. Click here.
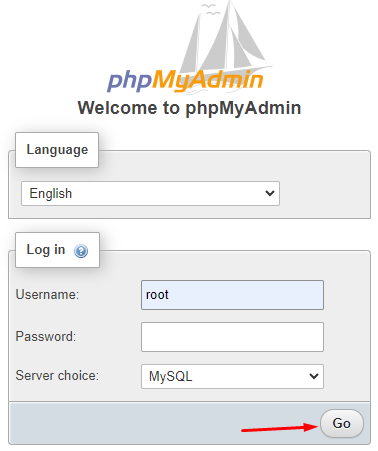
Step 2: Open http://localhost/phpmyadmin/ in your browser.
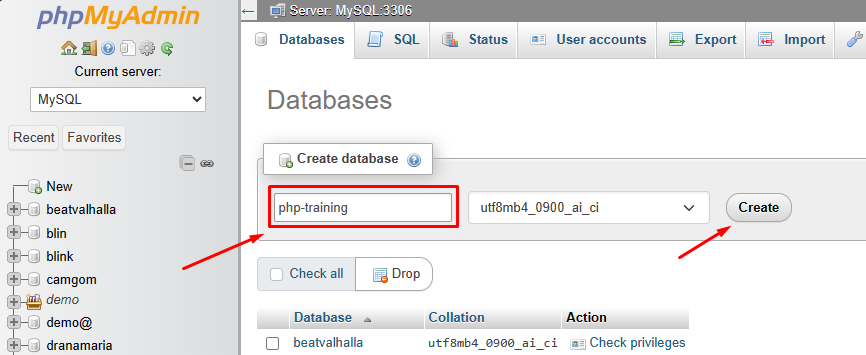
Step 3: Click new to create a new database.

Step 4: Write the name for your database and click create. Now your database is ready.
Deleting a Database: A Step-by-Step Guide:
Step 1
- Open your http://localhost/phpmyadmin/
- Search your database which you want to delete.
- Go to the operations in the top menu.
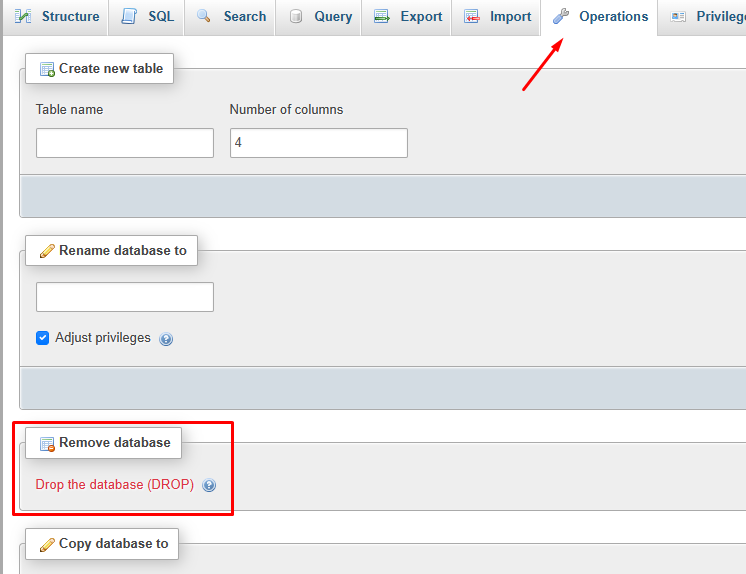
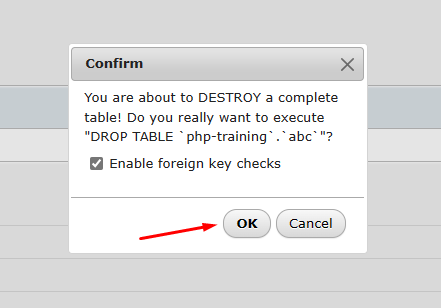
- Click DROP to delete the database.
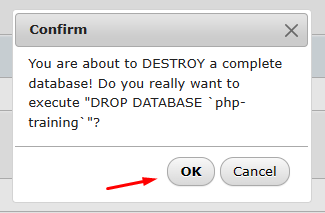
- Click ok and your database will be deleted.
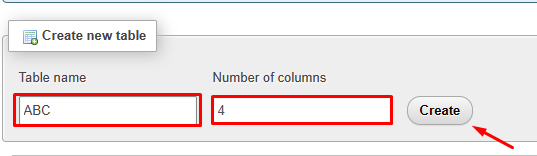
- Organize Your Data Effectively: Creating Tables in a Database
Deleting a Database: A Step-by-Step Guide:
Step 1
First create a database, after creating it write a table name and set the columns of the table. Click create.
Step 2
- After creating a table you see the four columns.
- Fill this with our selection like : NAME, LAST NAME, PHONE, EMAIL.
- Next choose the type of each column.
- Also you can select the length of each column.
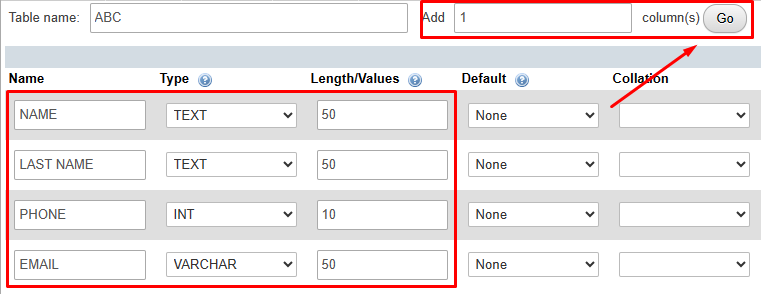
- You can add more columns just set the number of columns which you want and click go in the top right corner.
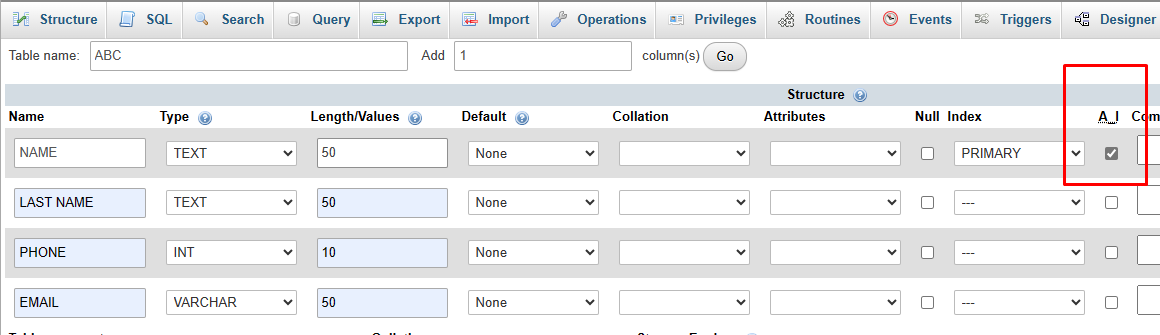
- You can also add an AI ( auto increment) option to adding multiple data entries in this table.
- Now your table is ready.
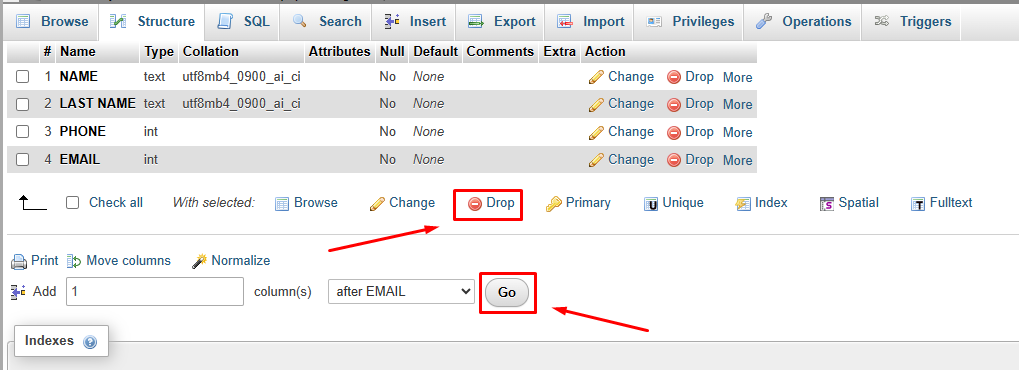
- You can remove and add columns by select and drop for deleting the column and click go to add more columns.
Mastering Your Database: Adding, Editing, and Managing Data in phpMyAdmin:
phpMyAdmin is a powerful web interface that allows you to manage your MySQL databases. This guide will walk you through adding entries (records), using tables effectively, and performing various data manipulation tasks.
Adding Entries (INSERT):
- Open phpMyAdmin: Access phpMyAdmin through your web hosting control panel or a direct URL provided by your host.
- Select the Database: In the left-hand pane, navigate to the database you want to work with and click on it.
- Choose the Table: From the list of tables displayed in the center pane, select the table where you want to add an entry.
- Insert New Record: Click the “Insert” tab located above the table data.
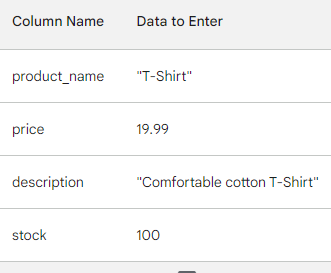
- Fill in the Values: Each table column will have a corresponding input field. Enter the data for each column according to its data type (text, number, date, etc.).
- Submit the Entry: Click the “Go” button at the bottom of the form to insert the new record into the table.
Example: Adding a new product to a “products” table:
Using Tables Effectively:
- Understanding Columns: Each column represents a specific data field (e.g., product name, price).
- Primary Key: Most tables have a primary key column that uniquely identifies each record.
- Data Types: Ensure you enter data that matches the defined data type for each column (e.g., numbers for quantity, dates for specific formats).
Adding Columns (ALTER):
- Select the Table: Choose the table where you want to add a new column.
- Structure Tab: Click on the “Structure” tab located above the table data.
- Add Column: Locate the “Add column” section and define the following:
- Column name
- Data type (text, number, date, etc.)
- Other options like “Allow nulls” or set a default value (optional)
- Save Changes: Click the “Go” button to add the new column to your table.
Example: Adding a “color” column to the “products” table (data type: varchar(255) to allow color names).
Removing Columns (ALTER):
- Select the Table: Choose the table with the column you want to remove.
- Structure Tab: Click on the “Structure” tab.
- Drop Column: Locate the column you want to remove and check the checkbox next to its name.
- Confirm Removal: Click the “Go” button at the bottom to confirm deletion of the selected column(s).
Important Note: Removing a column can potentially break functionalities or scripts that rely on the removed data. Be cautious and back up your database before making such changes.
Importing and Exporting Data:
- Import (LOAD DATA): You can import data from a CSV (comma-separated values) file into an existing table. phpMyAdmin provides options for specifying delimiters, field mapping, and handling duplicate entries.
- Export (SELECT INTO OUTFILE): Exporting data allows you to create a backup of your table data in a CSV format. This can be useful for transferring data to another database or creating backups for safekeeping.
Remember to consult the phpMyAdmin documentation for detailed instructions on import and export functionalities
Editing Columns (ALTER):
While you cannot directly edit existing columns (data type, name), you can achieve modifications by:
- Altering Data Type: Create a new column with the desired data type, transfer data from the old column, and then remove the old column.
- Renaming Columns: Use the “RENAME TO” option under the “Change” link next to the column name in the “Structure” tab.
Remember: Data manipulation tasks can impact your database. Always back up your data before making significant changes.
By following these steps and understanding the concepts, you'll be well on your way to managing your database effectively using phpMyAdmin.
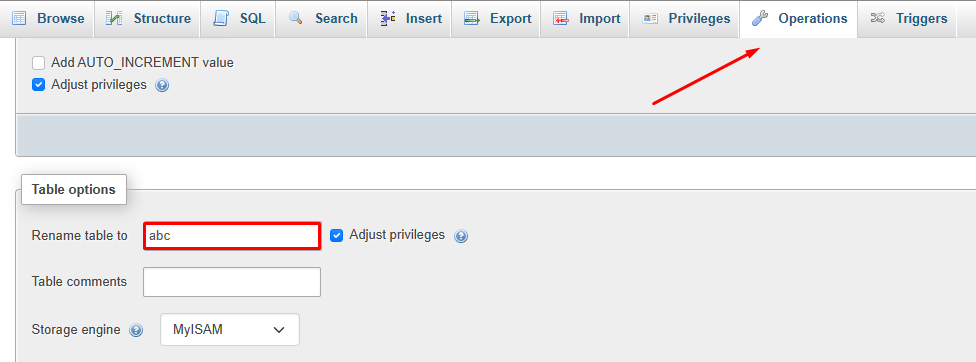
Manage Your Database: Renaming and Deleting Tables in WordPress
- Click the operations button in the top head
- Scroll down and rename the table and click go in the right end corner.
Delete the table and database
- Go to the operations in the top menu.
- Scroll down the end and you see some delete options.
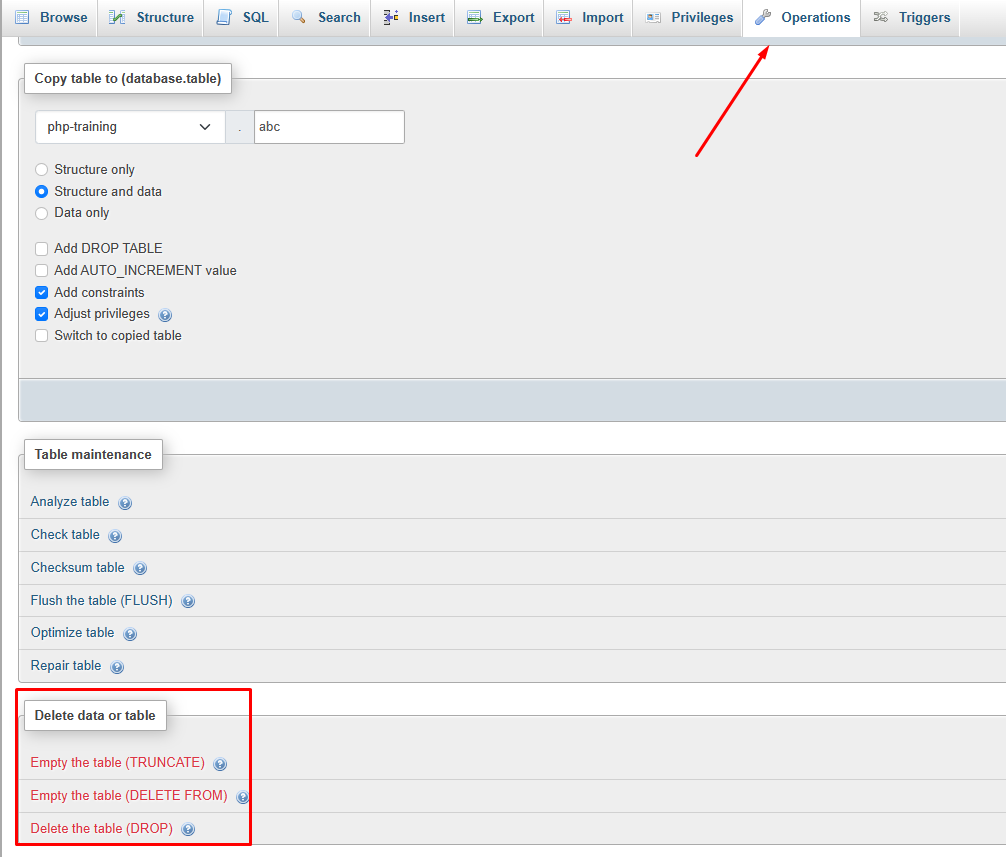
- You can delete your table here.